×
Menu
Index

Company Details

 
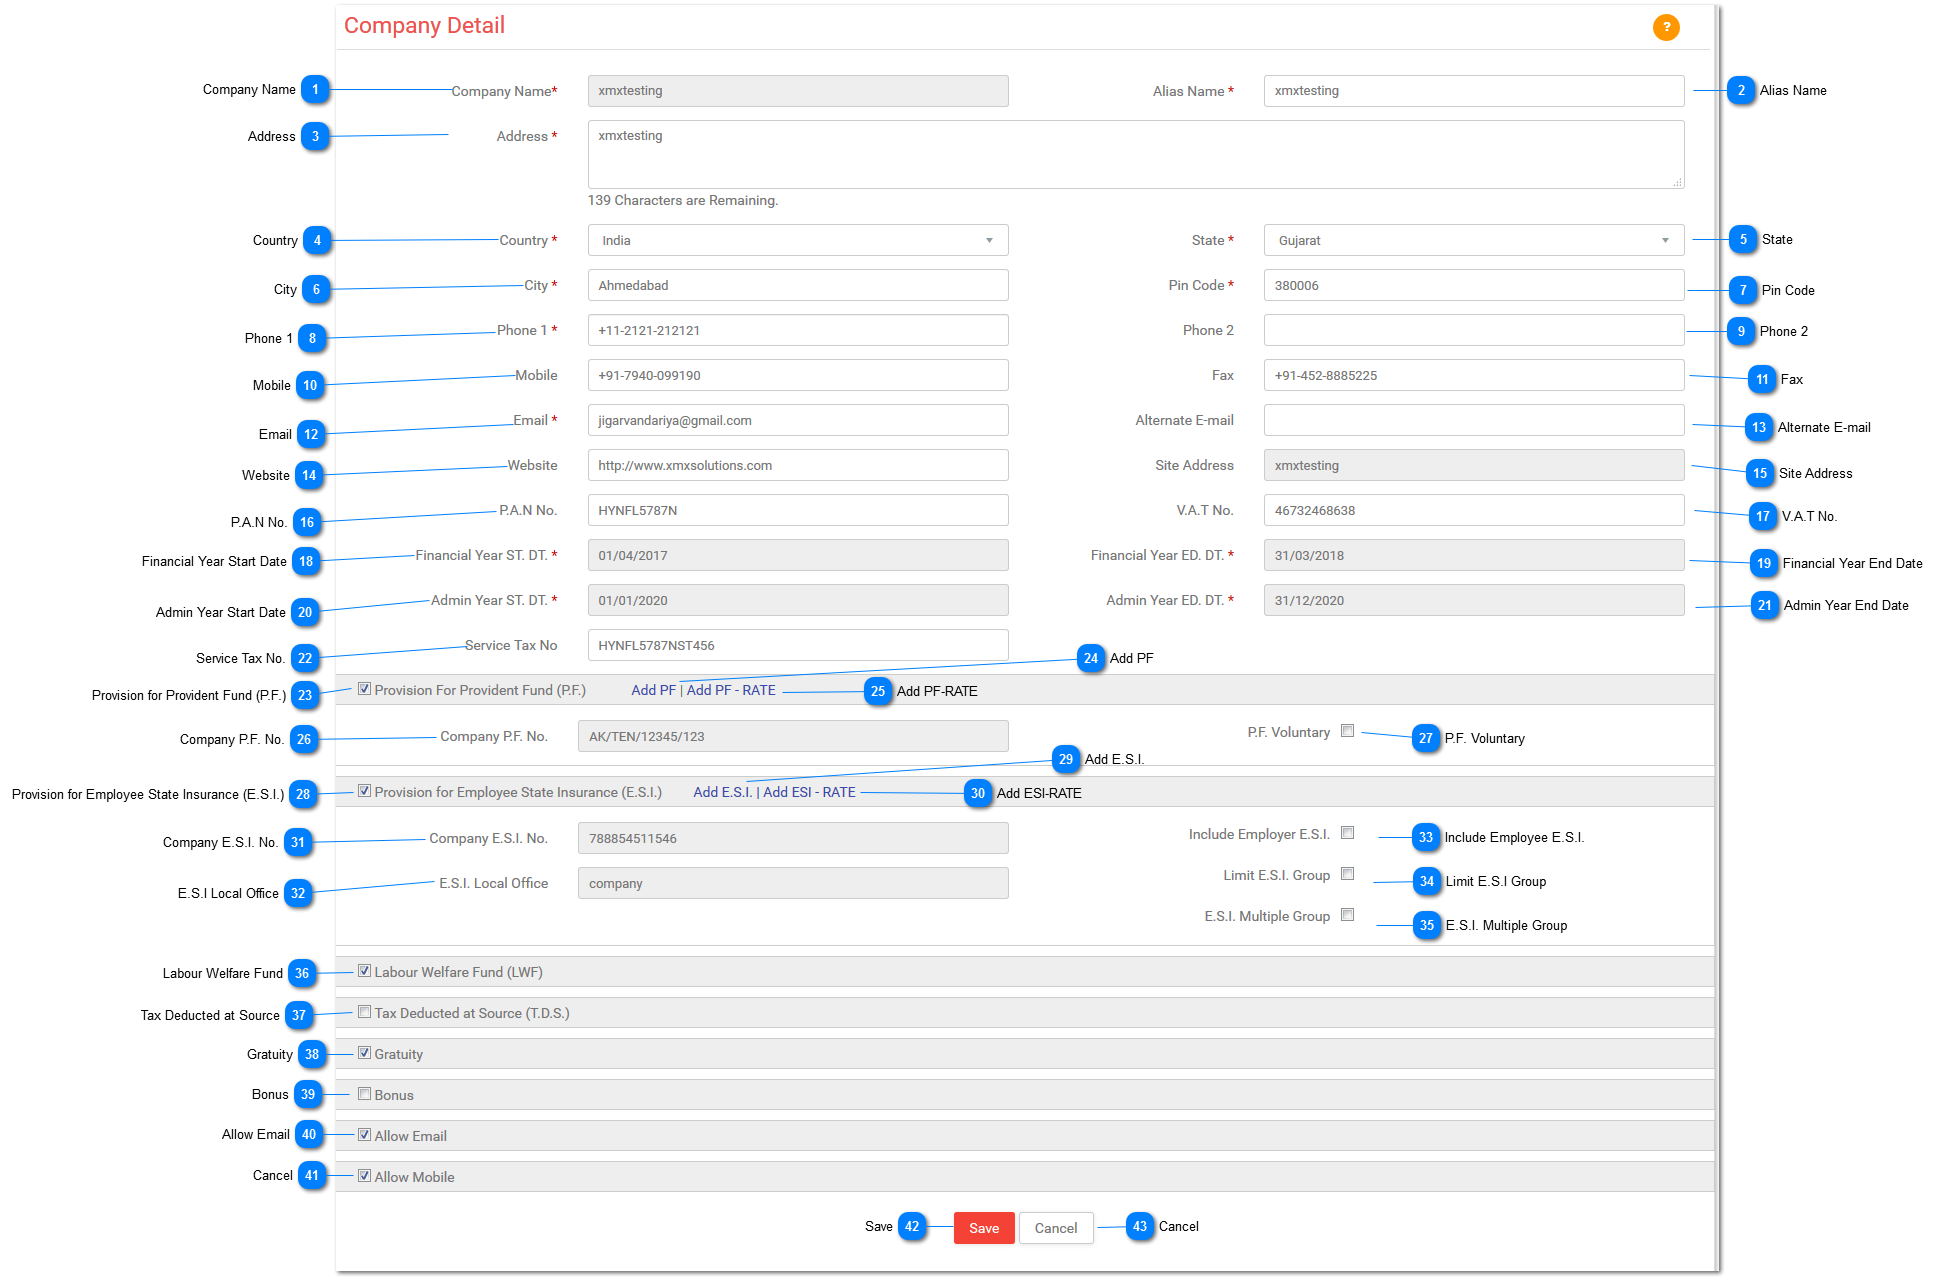
The basic details of the company, such as Name of the company, Phone number of a company, Address of the head office contact details including government registration numbers and licenses such as PAN (Personal Account Number), PF (Provident Fund), VAT (Value Added Tax) Number, ESI (Employee State Insurance) Number, LWF (Labor Welfare Fund), TDS (Tax Deducted at Source) Numbers etc are to be updated by the company while registration in HR Mangtaa for the smooth function of all the functionalities of the application.
 
Admin can edit the information except 'Company Name' , 'Site address' , 'Financial Year ST DT' , 'Financial Year ED DT' , 'Admin Year ST DT' , 'Admin Year ED DT'.
Company Details
 
1

Company Name

1. Company Name
  • This filed contains your company name with maximum 100 characters.
  • It is not editable.
  • Once your company is created it will not change.
2

Alias Name

2. Alias Name
  • Enter your company alias name with maximum 100 characters.
  • This functionality allows you to use a short name if your registered company name is too big.
  • You can also enter the company name as alias name.
3

Address

3. Address
  • Enter the address of the company Head quarters with 150 characters.
4

Country

4. Country
  • Select the country where the company is registered form the drop down.
5

State

5. State
  • Select the state from the drop down on the basis of the country selection.
6

City

6. City
  • Enter the city where your company is located.
7

Pin Code

7. Pin Code
  • Enter the six digit pin code on the basis of your company area.
8

Phone 1

8. Phone 1
  • Enter the phone number. (Landline)
  • Extension code should be required.
  • Ex:+91-7926-433919
9

Phone 2

9. Phone 2
  • Enter the another phone number. (Landline)
  • If there is no another phone number available you can leave it.
10

Mobile

10. Mobile
  • Enter mobile number.
  • Ex:+91-9925-120749
11

Fax

11. Fax
  • Enter Fax number.
  • Follow this format.
  • (country code)(area code)(local number)
  • Ex:+91-79-26433919
12

Email

12. Email
  • Enter Email address.
13

Alternate E-mail

13. Alternate E-mail
  • Enter alternate email address which is available.
14

Website

14. Website
  • Enter your company website address. (URL)
  • Ex:http://www....OR https://www...
15

Site Address

15. Site Address
  • Site Address of the company website will show here you will not be able to change it once your company is created.
16

P.A.N No.

16. P.A.N No.
  • Enter company PAN Number.
  • It should be in 10 digits.
  • 10 digits:5 digit- alphabet (upper form)
                       4 digit- numeric
                       1 digit- alphabet (upper form)
  • Ex:ABCDE1234F
17

V.A.T No.

17. V.A.T No.
  • Enter company VAT Number.
  • VAT Number is11 digit number.
  • First two digits identify the state where the registration is done.
  • Ex: 24 indicate State Gujarat.
18

Financial Year Start Date

18. Financial Year Start Date
  • Starting date of financial year which company follows.
  • As per Government rule Financial year is April- March.
  • It is not editable.
19

Financial Year End Date

19. Financial Year End Date
  • Ending date of financial year which company follows.
  • As per Government rule Financial year is April- March.
  • It is not editable.
20

Admin Year Start Date

20. Admin Year Start Date
  • Starting date of Admin year which company follows.
  • It is not editable.
21

Admin Year End Date

21. Admin Year End Date
  • Ending date of Admin year which company follows.
  • It is not editable.
22

Service Tax No.

22. Service Tax No.
  • Enter Service tax Number of the company.
  • Service Tax number is PAN based number. i.e. to say that it is based on the PAN No. of the applicant.
  • It is a 15 digit number.
  • Format of the Service Tax Number is as follows:
  • 1st Ten Digit: PAN No.
  • 11 & 12th Digits: Service Tax Code (It is either ST or SD).
  • 13 to 15th Digits: Serial No. for Service Tax No. allotted for a PAN Card.
  • If you have applied for registration of one premise it would be 001, and so for the registration of 2nd premise it would be 002.
23

Provision for Provident Fund (P.F.)

23. Provision for Provident Fund (P.F.)
  • Select if your company have a provision for PF and you want to activate it.
24

Add PF

24. Add PF
  • You can add PF group by clicking Add PF from the given page.
  • This is optional, this applies to only those companies with multiple branches across the different states.
  • By clicking Add PF the smart window will pop out where you can enter following details:
*Business Rule:-
1)You will enter all fields in Getting Started module.
2)These all fields are fetched from the Getting Started page in Set Up page.
3)One time configuration for statutory compliances PF,ESI,PT.
4)After creation of a company, head office is display as a default branch.
5)You can edit head office information but you can't delete head office.
6)If branch is assigned then you can delete that branch.
7)Multiple PF Groups can't be assigned to one branch.
8)You can see this page in following modules....
  • Getting Started> Company Settings> Company Details> Add PF
  • Set Up> Company Settings> Company Details> Add PF
  • Set Up> Payroll Settings> PF Group
 
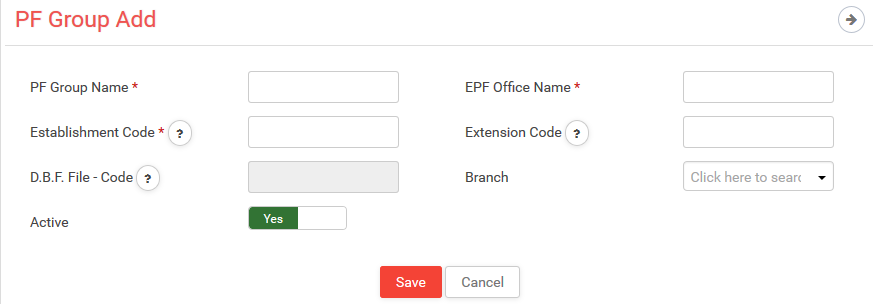
1)Provident Fund Group Name:
  • Enter Provident Fund Group Name with 2 digits of State code.
  • Ex: For Gujarat: GJ
     
2)EPF office name:
  • Enter EPF office name with 3 digits using alphabets.
  • Ex: AHD
     
3)Establishment Code:
  • Enter Establishment code with 7 digits in numeric.
  • Ex: 1234567
     
4)Extension Code:
  • Enter Extension  code with 3 digits in alphanumeric.
  • Ex: 000 or A1B or ABC.
     
5)D.B.F. File Code:
  • This field contains D.B.F. File code.
  • Ex: GJ/AHD/1234567/000
  • It is not editable.
 
6)Branch:
  • Select branch from the given drop down.
 
7)Active:
  • If you want to activate it then switch it with YES otherwise with NO.
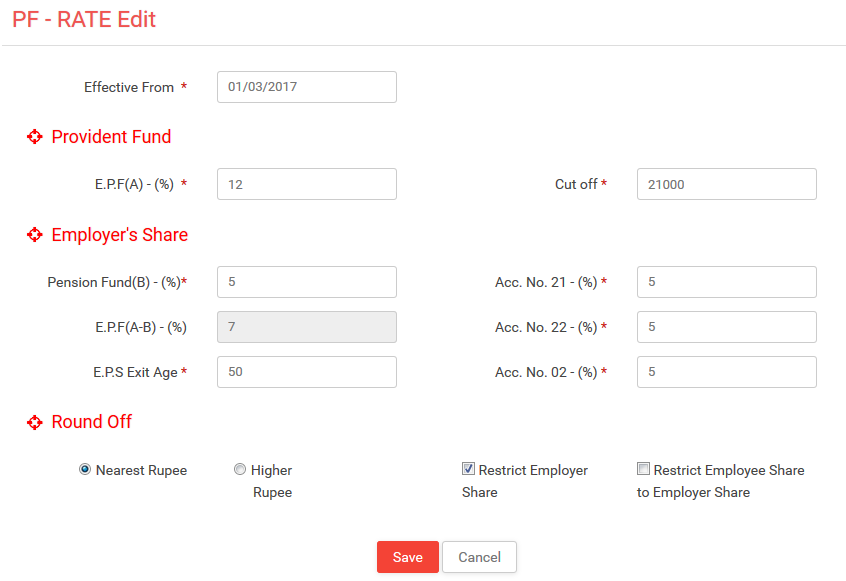
     
25

Add PF-RATE

25. Add PF-RATE
  • You can add/edit PF rate editor by clicking Add PF Rate from the given page.
  • This is optional, this applies to only those companies with multiple branches across the different states.
  • By clicking Add PF rate the smart window will pop out where you can enter following details..
1)Effective From:
  • Select date from which this rate will be applicable.
  • It should not be less than the last date.
     
    **Provident Fund:
     
    1)EPF (A) - (%):
  • As per the Govt. rule it is 12%.
    2)Cut Off:
  • As per the Govt. rule it is 15,000.
     
    **Employer's Share:
     
    1)Pension Fund(B) - (%):
  • As per the Govt. rule it is 8.33%.
    2)EPF(A-B) - (%):
  • As per the Govt. rule it will be displayed with 3.67%.
  • EPF(A-B)%=EPF(A)% - Pension Fund (B)%.
  • It is not editable.
    3)Acc. No. 21 - (%):
  • As per the Govt. rule it is 0.5%.
    4)Acc. No. 22 - (%):
  • As per the Govt. rule it is 0.005%.
    5)Acc. No. 02 - (%):
  • As per the Govt. rule it is 0.85%.
     
    **Round Off:
     
    1)Nearest Rupee:
  • Select Nearest Ten Rupees to round off value to nearest ten rupees.For more information     
  • Ex:If total income is :638944.50
            First paise would be ignored.
            Final total amount 638944 would be considered.
                        This amount would be reduced /increased to the nearest multiple of 10.
           Now here last digit is 4 which is less than 5,it would be reduced to the nearest
           multiple of 10 which would be 638940.
     
    2)Higher Rupee:
  • Select Higher Rupee to round off value to higher rupee.
  • Ex: If total income is :63.80
                                      Then Higher Rupee will be 64.
     
    3)Restrict Employer Share:
  • Select Restrict Employer Share to include it.
     
    4)Restrict Employee Share to Employer Share:
  • Select Restrict Employee Share to Employer Share to include it.
     
26

Company P.F. No.

26. Company P.F. No.
  • Add PF process will display on Company P.F. No.
  • It should be followed by this format.
  • PF Group Name/ EPF Office Name/Establishment Code/Extension code
  • Ex:GJ/AHD/1234567/000
  • It is not editable.
27

P.F. Voluntary

27. P.F. Voluntary
  • If company wants to cut more than 12% then select it.
28

Provision for Employee State Insurance (E.S.I.)

28. Provision for Employee State Insurance (E.S.I.)
  • Select if company have a provision for ESI and you want to activate it.
29

Add E.S.I.

29. Add E.S.I.
  • You can add ESI group by clicking Add ESI from the given page.
  • This is optional, this applies to only those companies with multiple branches across the different states.
  • By clicking Add ESI the smart window will pop out where you can enter following details...
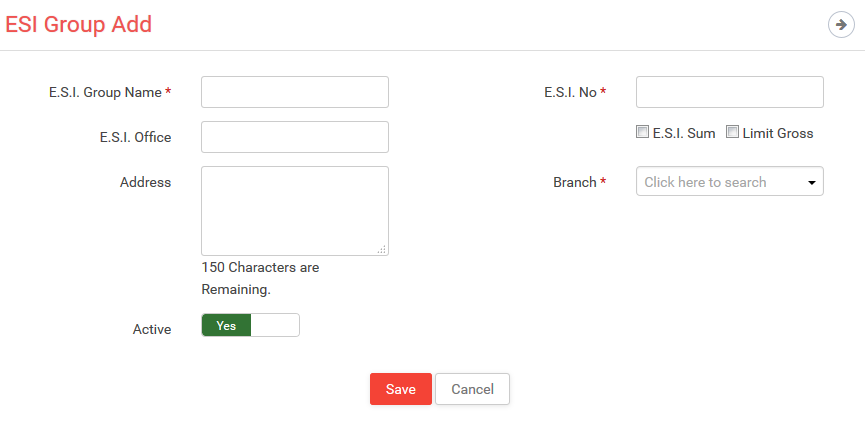
1)E.S.I. Group Name:
  • Enter the ESI group name.
  • Ex: Gujarat
     
2)E.S.I. No.:
  • Enter the ESI number with 17 digits associated with this group.
     
3)E.S.I. Office:
  • Enter the city name where the ESI for this group is located.
     
4)Address:
  • Enter the address related to this group with 150 characters.
     
5)E.S.I. Sum:
  • Click this checkbox if you want to add Employer ESI contribution.
     
6)Limit Gross:
  • Click this checkbox if you want to limit the gross salary of an employee.
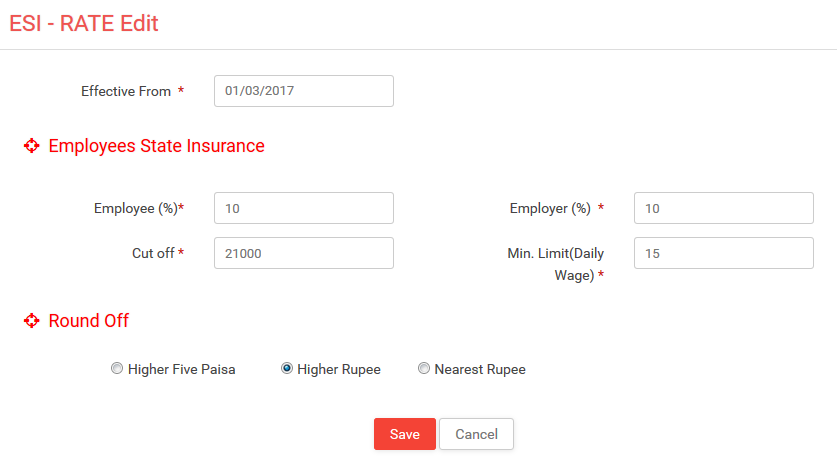
30

Add ESI-RATE

30. Add ESI-RATE
  • You can add/edit ESI rate editor by clicking Add ESI Rate from the given page.
  • This is optional, this applies to only those companies with multiple branches across the different states.
  • By clicking Add ESI rate the smart window will pop out where you can enter following details...
 1)Effective From:
  • Select date from which this rate will be applicable.
     
 **Employees State Insurance:
 
 1)Employee (%):
  • As per the Govt. rule it is 1.75%.
 2)Employer (%):
  • As per the Govt. rule it is 4.75%.
 3)Cut Off:
  • As per the Govt. rule it is 15,000 till 31-12-2016.
  • As per the Govt. rule it is 21,000 from 1-1-2017.
 4)Min. Limit (Daily Wage):
  • As per the Govt. rule it is 100.
     
    **Round Off:    
     
5)Higher Five Paisa:
  • Select Higher Five Paisa to round off value to higher rupee. Higher Five Paisa Rs. 166.25 Rs.167.
6)Higher Rupee:
  • Select Higher Rupee to round off value to higher rupee. Higher Rupees Rs. 22.30 Rs.23.
7)Nearest Rupee:
  • Select Nearest Rupee to round off value to nearest rupee. Nearest Rupee Rs. 22.30 Rs. 22.
31

Company E.S.I. No.

31. Company E.S.I. No.
  • Add ESI process will display on Company E.S.I. No.
  • It should be in 17 digits with numeric form.
  • It is not editable.
32

E.S.I Local Office

32. E.S.I Local Office
  • It will come from Add ESI-ESI Office Name.
  • If you want to edit it go to Add ESI-ESI Office Name.
  • It is not editable.
33

Include Employee E.S.I.

33. Include Employee E.S.I.
  • Select it if you want to include Employer ESI which is 4.75%.
34

Limit E.S.I Group

34. Limit E.S.I Group
  • Select it if you want to include Limit ESI Group which is 15,000.
35

E.S.I. Multiple Group

35. E.S.I. Multiple Group
  • Select it if you want to include ESI Multiple Group.
36

Labour Welfare Fund

36. Labour Welfare Fund
  • Select this checkbox if your company allows deductions of Labour Welfare Fund.
  • It will follow Employee Contribution:3Rs.
                         Employer Contribution:6Rs.
  • It will consider in JUNE and DECEMBER.
37

Tax Deducted at Source

37. Tax Deducted at Source
  • Select this checkbox if your company allows deductions of Tax Deducted at Source (T.D.S.)
38

Gratuity

38. Gratuity
  • Select this checkbox if your company allows gratuity.
39

Bonus

39. Bonus
  • Select this checkbox if your company allows deduction tax from bonus.
40

Allow Email

40. Allow Email
  • If you will select this checkbox then in further places also it will become mandatory.
41

Cancel

41. Cancel
  • If you will select this checkbox then in further places also it will become mandatory.
42

Save

42. Save
  • If you want to save changes press this button.
43

Cancel

43. Cancel
  • If you want to cancel changes press this button.
The help manual was created with Dr.Explain